Hi everyone,
thanks for reading the blog. I am closing for the year with one more round of software upgrades and one more post in the pipeline.
Happy Holidays and Merry Christmas (substitute your own holiday if desired :)
FortiOS:
3.0 MR7 Patch 2 (Build 733)
FortiMail:
3.0 MR4 Patch 3 (Build 426)
FortiAnalyzer:
3.0 MR7 Patch 3 (Build 726)
Monday, December 22, 2008
Monday, December 1, 2008
Software Updates
Catching up on Fortinet Software Updates:
FortiOS:
-3.0 MR6 Patch 4
-3.0 MR7 Patch 1
FortiManager:
-3.0 MR6 Patch 5
-3.0 MR7 Patch 2
FortiOS:
-3.0 MR6 Patch 4
-3.0 MR7 Patch 1
FortiManager:
-3.0 MR6 Patch 5
-3.0 MR7 Patch 2
Labels:
fortimanager,
fortios,
software


Monday, November 10, 2008
Intra-Zone Traffic
You can combine multiple interfaces/Vlans/VPN tunnels into a zone to make policy creation easier. To create zones go to System -> Network -> Zone -> Create New. For example you can have 10 Vlans combined into a zone called Vlans. The zone will now show up in the policy section when you create policies. You can then create new policies between the "Vlans" zone and the internal interface for example, thus allowing you to use a single policy rather than a policy for each Vlan to the internal interface.
In the zone configuration you can check the "Block intra-zone traffic" check box to prohibit the different interfaces in the same zone to talk to each other.
Let's assume you have ten interfaces in your zone and the Block intra-zone traffic box checked. You now want to allow traffic between a very small number of networks on different interfaces that are part of the zone but you do not want to disable the intra-zone blocking.
For this scenario the Vlans are defined as: 192.168.1.0/24, 192.168.2.0/24, ... 192.168.10.0/24
To enable this create a policy as follows:
Source Interface: Zone-name (e.g. Vlans)
Source Address: 192.168.1.0/24
Destination: Zone-name (same as Source Interface, i.e. Vlans)
Destination Address: 192.168.2.0/24
This policy will allow traffic from 192.168.1.x to 192.168.2.x even though they are in the same zone and intra-zone blocking is enabled. Think of the intra-zone blocking as a default deny rule and you have to specifically override it by creating a policy within the zone.
Labels:
configuration examples,
fortigate
Thursday, November 6, 2008
Firewall Guru Feedback
So what do you guys think? Do you like the format of the blog? Any suggestions on what you would like to see? Anything covered in more or in less detail? Post some feedback when you get a chance.
Monday, October 27, 2008
Software Updates
Fortinet has released the following software updates at http://support.fortinet.com
FortiMail:
MR4 Patch 2
FortiAnalyzer:
MR7 Patch 2
FortiMail:
MR4 Patch 2
FortiAnalyzer:
MR7 Patch 2
Labels:
fortianalyzer,
fortimail,
software
Thursday, October 16, 2008
Firewall Cleanup - Unused Policies
Here is a neat little trick that comes in handy in a number of situations. Let's assume that you inherit a Fortigate firewall with hundreds of policies defined. The previous administrator did not provide you with any information on what the rules do. You are left to figure out if all the rules are still required.
If you are running FortiOS 3.0 MR5 Patch 3 and later an easy way to see if your firewall policies are still being used is to modify the "Column Settings" under Firewall -> Policy. Select "Count" and click the right arrow to move it from "Available fields" to "Show these fields in this order".
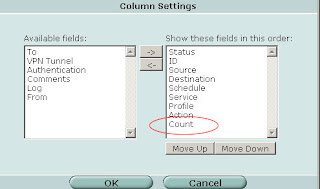
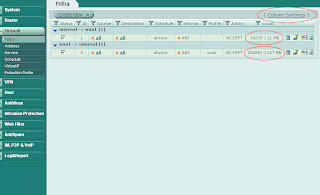
Now your policies will show the "Count" column with indicates the number of times the policy has been invoked and the number of bytes transferred. Start your investigation with any rules that are "0/0" (i.e. not in active use) and continue by working on rules that have a low hit/byte count.
If you are running FortiOS 3.0 MR5 Patch 3 and later an easy way to see if your firewall policies are still being used is to modify the "Column Settings" under Firewall -> Policy. Select "Count" and click the right arrow to move it from "Available fields" to "Show these fields in this order".

Now your policies will show the "Count" column with indicates the number of times the policy has been invoked and the number of bytes transferred. Start your investigation with any rules that are "0/0" (i.e. not in active use) and continue by working on rules that have a low hit/byte count.

Labels:
fortigate,
gui,
troubleshooting
Monday, October 13, 2008
Bulk Command Import
Ever had to move a firewall configuration to a different hardware platform with different interface names? Ever had to create a gazillion new objects and paled at the prospect of spending hours in front of the web GUI?
A very handy but somewhat hidden feature to relieve you from your nightmares is the bulk import of CLI commands. Sure, you can copy a text document and paste it into an SSH CLI session. However I have noticed in the past that this does not always work terribly well. A good way to make sure all commands are successfully transferred is the "Import Bulk CLI Commands" menu. You can find it under System -> Maintenance -> Backup & Restore Tab: Advanced. Click on the blue triangle next to "Advanced" to expand the section and make it visible.
A very handy but somewhat hidden feature to relieve you from your nightmares is the bulk import of CLI commands. Sure, you can copy a text document and paste it into an SSH CLI session. However I have noticed in the past that this does not always work terribly well. A good way to make sure all commands are successfully transferred is the "Import Bulk CLI Commands" menu. You can find it under System -> Maintenance -> Backup & Restore Tab: Advanced. Click on the blue triangle next to "Advanced" to expand the section and make it visible.
- Prepare a plain text file with all the commands you want to import
- Below "Import Bulk CLI Commands" click "Browse"
- Select the text file which contains your firewall commands
- Click "Import Now"
Thursday, October 9, 2008
Monday, October 6, 2008
Monitoring Fortinet Firewalls with Cacti
Cacti (http://www.cacti.net) is a popular SNMP graphing tool that can monitor pretty much any device which supports SNMP. Here is a quick guide on how to configure Cacti to monitor Fortigate interfaces, total active sessions, and system resource utilization. I will leave installing Cacti up to you :)
Start in the Console by clicking Data Templates in the Templates section. Click Add in the top right corner and enter the values from the following screenshot. Then click Save.


Start in the Console by clicking Data Templates in the Templates section. Click Add in the top right corner and enter the values from the following screenshot. Then click Save.

Afterwards create two more Data Templates based on the next two screenshots.
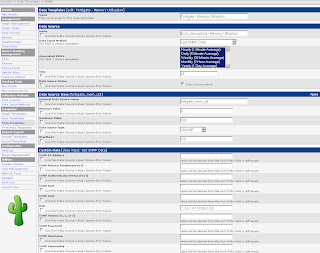
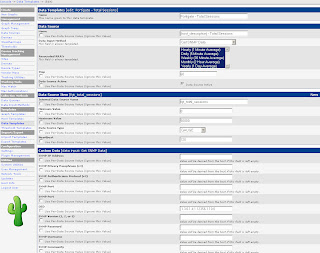
The Data Templates tell Cacti which values (OIDs) to monitor.
Next, go to Graph Templates in the Templates section. As before click Add in the top right corner and define the following two Graph Templates: Fortigate – System Resources and Fortigate – Total Sessions. The System Resources graph will monitor CPU and memory utilization in one combined graph.


Next create a Host Template as per the screenshot below.

Now you are ready to start monitoring firewalls. Under Management go to Devices and click Add. Define a new device. Sample values are in the screenshot. That’s it. Graphs will start to update after Cacti’s next polling cycle.
Labels:
configuration examples,
fortigate
Friday, October 3, 2008
Software Updates
Fortinet has released the following updates:
FortiOS:
-3.0 MR7 Patch 1
-3.0 MR3 Patch 14
FortiOS:
-3.0 MR7 Patch 1
-3.0 MR3 Patch 14
Friday, September 26, 2008
Translating Firewall Configurations
If you are working on a project to migrate from Cisco, Juniper or Checkpoint to Fortinet here is a handy utility on the Fortinet website which can help out. It let's you take configuration files from the three other major vendors out there and converts what it can for you into Fortinet speak.
http://convert.fortinet.com
If anyone is using this go ahead and post some feedback on how well it works.
http://convert.fortinet.com
If anyone is using this go ahead and post some feedback on how well it works.
Monday, September 22, 2008
Restoring Firewall Configurations
Imagine your firewall bites the dust and you get a shiny new one from Fortinet. You have backed up the configuration file from your old box and want to restore it to your new unit. There is one thing to watch out for during the process if you backed up your file without password protecting it. Here is the process to backup and restore the configuration without running into snags:
Backup the firewall configuration:
-System -> Maintenance -> Backup
Optionally you can password protect the file which is always a good idea. If you do not enter a password your entire configuration is backed up except for the admin account. To successfully restore your configuration on the new system if you did not password protect the file:
-Change the IP address of the new unit or connect to the default IP on the internal interface at https://192.168.1.99. Login using the default of admin with a blank password. Then
-System -> Admin and change the admin user password.
-System -> Maintenance -> Restore configuration from: Local PC
-Click Browse and select the backup configuration file
-Click Restore
If you do not set the admin password before restoring the config file you will no longer be able to login as admin.
Potential GUI Bug in FortiAnalyzer
Here is the scenario under which the problem occurs:
-A firewall is reporting to FortiAnalyzer and is part of a group object
-The firewall is made part of an HA reporting object
The original firewall object is still retained but the "edit" button to the right of the screen is gone. The workaround is to manually edit the group which the firewall is part of and remove the firewall from the group. Then the "trashcan" icon will appear and let you remove the old instance of the firewall.
Labels:
fortianalyzer,
potential bugs
Monday, September 15, 2008
Active FTP on non-standard Ports
When you use active ftp the FortiOS session helper keeps track of the connections you open. It then permits the ftp server you are connecting with to actively open a connection back to your client program. This works well as long as you use FTP on its standard TCP port which is 21. If you have an application which needs to open active FTP connections on a port other than 21 you need to add additional session helpers. Here is how you do it on the command line:
config system session-helper
show (this lists all the helpers configured. Note the last edit, in this example "edit 11")
** snip **
edit 10
set name sip
set port 5060
set protocol 17
next
edit 11
set name dns-udp
set port 53
set protocol 17
next
end
edit 12 (the number you use here should be the last edit + 1)
set name ftp
set port 999 (in this example the application uses ftp on port 999, substitute your port number here)
set protocol 6
end
In the above example we are configuring the firewall to listen on port 999 and treat connections on this port as active FTP.
Labels:
CLI,
configuration examples,
fortigate,
fortios
Thursday, September 11, 2008
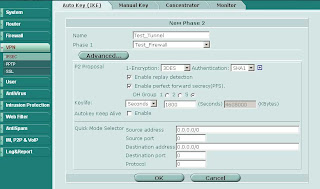
VPN GUI Bug in MR5 and MR6
A GUI bug exists in MR5 and MR6 when configuring IPSEC VPNs. This has been confirmed in MR5 Patch 4 and MR6 Patch 2 and may exist in other versions.
The following will cause you to lose any Phase 2 Security Associations configured under the corresponding Phase 1:
-Phase 1 configured using routed (interface) mode
-Any number of phase 2 SAs
-The VPN is assigned to a zone under System -> Network -> Zone
When you attempt to rename the phase 1 object you receive an error message "Object in Use". This message indicates that the VPN is in use by a zone which is normal. When returning to the VPN configuration screen at VPN -> IPSEC -> Auto Key (IKE) all your phase 2 SAs have been lost completely. They are also erased from the system configuration and cannot be recovered without a backup of the configuration.
** Update **
This was bug 68864 and has been resolved in FortiOS 3.0 MR7 Build 726.
Labels:
fortigate,
gui,
potential bugs
Wednesday, September 10, 2008
Fortinet and Cisco MARS Integration
Cisco MARS is a tool which collects netflow and syslog data from the devices on your network and correlates them to look for specific events. It allows you to find suspicious activity on the network such as port scans or virus outbreaks. Here is a handy guide for integrating Fortigate firewalls by sending syslog data to MARS so the firewall data can contribute to your event analysis.
In the Fortigate GUI:
-Go to Log&Report -> Log Config
-Enable the Syslog check box and and enter the name or IP address of your Cisco MARS collector
-Set Port to 514
-Set Minimum Log Level to Information and the Facility to Alert
That's it on the firewall side. Now any active firewall rule configured to log traffic will send syslog information to MARS.
In the Cisco MARS GUI:
-Go to Admin -> Custom Setup -> User Defined Log Parser Templates
-At the Device/Application type click Add and enter the following values:
-Type: Appliance
-Vendor: Fortinet
-Model: Generic
-Version: 3.0
-Click Submit
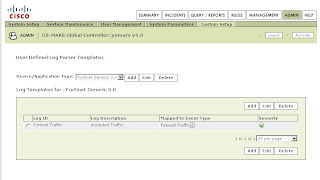
-Under Log Templates for Fortinet Generic 3.0 click Add and enter the following values:
-Log ID: Fortinet Traffic
-Description: Accepted Traffic
-Under the Map to Event Type click Add and enter the following values:
-Event ID: Firewall Traffic
-Description: Firewall Traffic
-Severity: Green
-Click Submit
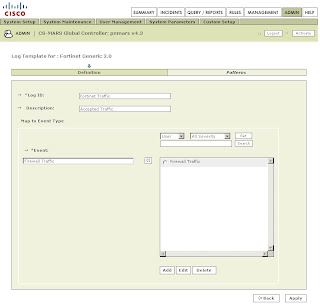
Back on the Log Template Page select the newly created Firewall Traffic Event Type and click on the left double arrow to move it into the Event box. Then click Apply.
Once this has been applied click on Patterns which has become an active link.
Add the following patterns in order. Leave all Value Format fields blank except for the one in position 1:
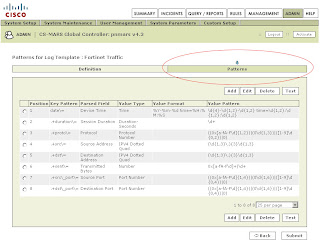
Position: 1
Key Pattern: date\=
Parsed Field: Device Time
Value Type: Time
Value Format: %Y-%m-%d time=%H:%M:%S
Value Pattern: \d{4}-\d{1,2}-\d{1,2} time=\d{1,2}:\d{1,2}:\d{1,2}
Position: 2
Key Pattern: .+duration\=
Parsed Field: Session Duration
Value Type: Duration-Seconds
Value Pattern: \d+
Position: 3
Key Pattern: .+proto\=
Parsed Field: Protocol
Value Type: Protocol Number
Value Pattern: ((0x[a-fA-F\d]{1,2})|(0\d{1,3})|([1-9]\d{0,2})|0)
Position: 4
Key Pattern: .+src\=
Parsed Field: Source Address
Value Type: IPV4 Dotted Quad
Value Pattern: (\d{1,3}\.){3}\d{1,3}
Position: 5
Key Pattern: +.dst\=
Parsed Field: Destination Address
Value Type: IPV4 Dotted Quad
Value Pattern: (\d{1,3}\.){3}\d{1,3}
Position: 6
Key Pattern: .+sent\=
Parsed Field: Transmitted Bytes
Value Type: Number
Value Pattern: 0x[a-fA-F\d]+|\d+
Position: 7
Key Pattern: .+src\_port\=
Parsed Field: Source Port
Value Type: Port Number
Value Pattern: ((0x[a-fA-F\d]{1,4})|(0\d{1,6})|([1-9]\d{0,4})|0)
Position: 8
Key Pattern: .+dst\_port\=
Parsed Field: Destination Port
Value Type: Port Number
Value Pattern: ((0x[a-fA-F\d]{1,4})|(0\d{1,6})|([1-9]\d{0,4})|0)
Click Submit.
Under System Setup -> Device Configuration and Discovery Information -> Security and Monitor Devices you can now configure devices of type Fortinet Generic 3.0
(Thanks to Pandriya for spotting a typo in this post)
Labels:
configuration examples,
fortigate
Software Updates
Fortinet has release the following software updates at their support website:
Fortimanager 3.0 MR7 Patch 1
Fortimail 3.0 MR4 Patch 1
Fortianalyzer 3.0 MR7 Patch 1
Fortimanager 3.0 MR7 Patch 1
Fortimail 3.0 MR4 Patch 1
Fortianalyzer 3.0 MR7 Patch 1
Labels:
fortianalyzer,
fortimail,
fortimanager,
software
Tuesday, August 19, 2008
Software Updates
Fortinet has been busy. Here are the latest public releases available for registered users from the support website.
FortiOS:
MR3 Patch 14
MR6 Patch 3
FortiManager:
MR6 Patch 4
FortiAnalyzer:
MR6 Patch 1
MR7 Patch 1
I highly recommend FortiManager MR7 GA. There are a number of improvements, most notably the speed of the web interface.
FortiOS:
MR3 Patch 14
MR6 Patch 3
FortiManager:
MR6 Patch 4
FortiAnalyzer:
MR6 Patch 1
MR7 Patch 1
I highly recommend FortiManager MR7 GA. There are a number of improvements, most notably the speed of the web interface.
Labels:
fortianalyzer,
fortimanager,
fortios,
software
Monday, August 18, 2008
Fortinet Diagnostic Commands
Here is a helpful document that discusses various debug commands and example situations for using them.
Labels:
CLI,
debug,
troubleshooting
Friday, July 25, 2008
Scheduling Scripts in FortiManager
You can schedule scripts to execute automatically in FortiManager. Once you have created a script select a group of firewalls which you have created (the "All Fortigate" group cannot be used to schedule scripts). On the top of the screen select Script -> Create New. Select one of the available scripts and click on the Right Arrow -> button. Under Schedule set the Execute Schedule Type to Schedule and now you can select either One-Time or Recurring.
Please note that when you want to run the same script multiple times per day you have to use the following process:
Please note that when you want to run the same script multiple times per day you have to use the following process:
- Create your script
- Make x number of copies of the script (x being the number of times you want to run it per day)
- Create one schedule for each script
Software
Fortinet has released 3.0 MR4 for Fortimail and 3.0 MR7 for Fortimanager. Your Fortimanager needs to be at or above the same software level as the firewalls you want to manage.
FortiManager 3.0 MR7 sports a newly revamped GUI. Also the web interface speed is extremely quick now. This was one of our biggest gripes in the past. Thanks for listening Fortinet ;)
FortiManager 3.0 MR7 sports a newly revamped GUI. Also the web interface speed is extremely quick now. This was one of our biggest gripes in the past. Thanks for listening Fortinet ;)
Labels:
fortimail,
fortimanager,
software
Monday, July 21, 2008
Recommendation: Do Not Upgrade to FortiOS 3.0 MR6 Patch 2 Under Certain Conditions
If you have seen your firewall CPU utilization go to 100% and stay there my recommendation is to NOT upgrade to FortiOS 3.0 MR6 Patch 2 at this time. Where before the firewall would continually run high CPU utilization it did not appear to affect traffic. After the upgrade to MR6 Patch 2 traffic is now being impacted. The firewalls will still pass ICMP but services such as http, snmp and others are being effectively blocked. See my June post about further details and how to temporarily work around the problem.
*** Update ***
Fortinet Engineering has confirmed this as an infinite loop problem in the IPS Engine triggered by DCE/RPC type traffic. In 3.0 MR5 the impact was not noticeable. In 3.0 MR6 the IPS engine has a higher priority which is why traffic is now affected.
** Update to the previous Update **
Fortinet Engineering has fixed the issue. The new IDS package 1.097 should take care of it.
Labels:
debug,
fortigate,
fortios,
potential bugs
Friday, July 18, 2008
Deny Rules are counter intuitive in 3.0 MR6
Say you want to block traffic from a known bad IP on the Internet to all systems on your DMZ. All machines in the DMZ are natted to the outside world using Virtual IPs. Generally you would expect to create a rule like this:
From: External, IP address of bad external system
To: DMZ, Any
Action: Deny
In 3.0 MR6 (and potentially other versions) this does not work. You have to block traffic to specific NAT addresses. The fastest way to do this is to create a VIP Group under Firewall -> Virtual IP -> VIP Group and add all your natted addresses to the group, let's call it "All NAT" for example. You would then build the following rule:
From: External, IP address of bad external system
To: DMZ, "All NAT"
Action: Deny
As per the official response from Fortinet this is working as designed and is not a bug.
From: External, IP address of bad external system
To: DMZ, Any
Action: Deny
In 3.0 MR6 (and potentially other versions) this does not work. You have to block traffic to specific NAT addresses. The fastest way to do this is to create a VIP Group under Firewall -> Virtual IP -> VIP Group and add all your natted addresses to the group, let's call it "All NAT" for example. You would then build the following rule:
From: External, IP address of bad external system
To: DMZ, "All NAT"
Action: Deny
As per the official response from Fortinet this is working as designed and is not a bug.
Labels:
configuration examples,
fortigate
Wednesday, July 16, 2008
Packet Capture for non-Admin Users
Any user on the Fortigate platform used to be able to capture traffic on the ANY interface using
diag sniffer packet any
In FortiOS 3.0 MR6 Fortinet has imposed some restrictions. The admin user can still utilize this syntax. However any non-admin user must now specify an interface to capture traffic on as in the following examples.
diag sniffer packet wan1
diag sniffer packet internal
Trying to capture traffic using the ANY interface results in the following error if you are not the admin user:
diag sniffer packet any
No permission to sniff on interface any
Command fail. Return code -37
diag sniffer packet any
In FortiOS 3.0 MR6 Fortinet has imposed some restrictions. The admin user can still utilize this syntax. However any non-admin user must now specify an interface to capture traffic on as in the following examples.
diag sniffer packet wan1
diag sniffer packet internal
Trying to capture traffic using the ANY interface results in the following error if you are not the admin user:
diag sniffer packet any
No permission to sniff on interface any
Command fail. Return code -37
Tuesday, July 15, 2008
Fortimail - A Basic Setup
The Fortimail appliance is a great tool for combatting spam. Here is a basic setup that will eliminate most spam even without the latest and greatest anti-spam updates from Fortinet.
- Configure the domains you want to receive email for under Mail Settings -> Domains
- Enable Verify Recipient Address. If your mail server responds to unknown recipients with a "User not found" message you can utilize the Use SMTP Server option. If your mail server discards invalid recipient addresses without notifying the sender you have the alternative of defining an LDAP server which lists all valid email accounts. The setup of an LDAP server is beyond the scope of this introduction. The advantage of verifying the recipient address is that anti-spam tests don't ever need to be performed on invalid addresses and invalid emails can be quickly discarded this way.
- Under Profile - Antispam click the copy button next to the antispam_basic_predefined_medium profile to create a copy. Name it something like medium_strength_profile. This process creates a copy of the default system scan profile which you can edit.
- FortiGuard-Antispam scan - If you have purchased a Fortinet support contract for your Fortimail unit. You can leave Black IP scan disabled.
- Greylist scan - This option tells every unknown sender to wait and try again later. Most spammers won't try again but any RFC compliant mail server will attempt to redeliver the mail every few hours at least. When the remote email server tries to deliver the same message again they are put on the passthrough list. This means that in the future they will not be challenged again. This is a very effective option and is highly recommended. The only slight drawback is that the initial email delivery can be delayed by a short while. Don't use greylisting if you require every email to always be delivered in real time.
- DNSBL scan - Allows the FortiMail unit to communicate with DNSBL (DNS Block List) servers to check the IP address of the mail server that delivered the message. If a match is found, the FortiMail unit treats the message as spam. Under config you can use the defaults of bl.spamcop.net and sbl-xbl.spamhaus.org.
- SURBL scan - Complementing the DNSBL component, which blocks messages based on spam origin, SURBL technology blocks messages that have spam hosts mentioned in message bodies. By scanning the message body, SURBL is able to determine if the message is a known spam message regardless of origin. Under config you can use the default of multi.surbl.org.
- Heuristic scan - Allows the FortiMail unit to examine messages for patterns common to spam messages. The heuristic scores are based on rules. For example, if the email header contains "As seen on national TV!", it gets a certain score toward being likely a spam email. The heuristic rules require no administrator modification or updating. A default rule set is provided and it is updated through the FortiGuard service as needed. New rules are added and rule scores are adjusted for maximum advantage.
Labels:
configuration examples,
fortimail
Thursday, July 3, 2008
Asymmetric Routing through Fortigate Stateful Firewalls
Sometimes it is necessary to forward traffic through Fortigates in an asymmetric fashion. Here is one example:
Host A: 192.168.1.1 (internal firewall interface)
Syslog Host B: 10.1.1.1 (dmz firewall interface)
Syslog Host C: 172.16.1.1 (internal firewall interface)
Host A sends log information to syslog host B which resides behind the Fortinet on the DMZ interface. The firewall policy is configured to permit all traffic from the internal interface to the DMZ and vice versa. Syslog host B stores a copy of the syslog data it receives. For the purpose of redundancy or further analysis by another system it then sends a copy of the syslog packet to syslog host C.
For syslog host C to be able to correctly interpret the syslog data syslog host B "spoofs" the source IP address of the original sender when forwarding the data. In other words syslog host B sends the data to syslog host C with a source address of host A. This allows syslog host C to determine who the original sender was. The logical packet looks something like this:
Physical sender: Syslog Host B
Source IP: 192.168.1.1 (spoofed)
Destination IP: 172.16.1.1
Syslog Data
The firewall will prevent this traffic from reaching the destination. It first saw the traffic from host A to syslog host B pass from the internal to the DMZ interface and created a corresponding entry in the session table. Now the firewall sees another packet purporting to be coming from host A to syslog host C but the source is now on the DMZ and the destination is on the internal network. This violates the firewall's state tables.
In order to work around this problem you can configure the firewall to support asymmetric routing. Please be aware that by doing this you are slightly reducing the effective security level of your firewall since spoofed packets can now more easily traverse the firewall. However in some cases you might require this option.
Asymmetric routing is configured on a per virtual domain (as of FortiOS 3.0 MR5). On the command line configure the following:
config system settings
set asymroute enable
end
Wednesday, July 2, 2008
Software Updates
FortiMail 3.0 MR3 Patch 1 is now available on the Fortinet Support Website.
There is improved logging when using recipient address verification. The system will now populate the "To" field even if the recipient is invalid. This allows you to see who people are attempting to send email to.
There is improved logging when using recipient address verification. The system will now populate the "To" field even if the recipient is invalid. This allows you to see who people are attempting to send email to.
Monday, June 30, 2008
Hands on Fortigate Demo
New to Fortinet? Want to get a first hand look at the GUI?
Take the Fortinet Demo unit for a spin here.
Login: demo
Password: fortigate
Take the Fortinet Demo unit for a spin here.
Login: demo
Password: fortigate
Thursday, June 26, 2008
Bugs in SSL VPN Process
Fortinet is currently working on a bug related to the SSL VPN process. After upgrading to FortiOS 3.0 MR6 Patch 2 the SSL VPN process can consume all available CPU resources regardless of user load. Fortinet is currently working on this problem with bug id 77702.
As a temporary workaround, if you are running into this issue you can use following procedure to restart the process and bring down the cpu usage from the command line interface.
diag sys top to identify the process id (pid) for sslvpnd
diag sys kill 11(pid) to restart sslvpnd
-Thanks to Dan Orth for the info.
As a temporary workaround, if you are running into this issue you can use following procedure to restart the process and bring down the cpu usage from the command line interface.
diag sys top to identify the process id (pid) for sslvpnd
diag sys kill 11
-Thanks to Dan Orth for the info.
Labels:
potential bugs,
SSL VPN,
troubleshooting
Monday, June 23, 2008
VPN Manager Gotchas in Fortimanager
Be careful when using interface mode VPN setups created in Fortimanager.
Imagine the following setup:
-HQ Site has a number of networks (10.x.x.x, 172.16.x.x, 192.168.x.x)
-Remote site has a class C network (172.17.1.x)
When defining your protected subnets in VPN-Manager -> VPN List -> Gateways you should configure specific networks and not use the default 0.0.0.0/0.0.0.0 network. If you use the 0.0.0.0 network and let the Fortimanager handle the static route creation you can end up with a situation where you have two default routes configured, one pointing to your valid WAN router and one pointing to the VPN tunnel. This has the undesirable effect of making your firewall unreachable.
(Not that this has happened to me of course :)
Labels:
fortimanager,
interface mode,
ipsec,
VPN
Thursday, June 19, 2008
Problems with IPS Engine
IPS Engine 1.092 is causing high CPU utilization on various models of Fortigate firewalls. As per Fortinet IPS Engine 1.096 should fix this issue and is due to be released via automatic update on Friday, June 27th.
Use the following command to determine which engine you are currently running
get system fortiguard-service status
You can use the following command to restart the IPS engine. This resolves the high CPU utilization temporarily without having to reboot the firewall.
diag test app ipsmonitor 99
Another command you can try is
diag test app ipsmonitor 5
This puts the IPS Engine into bypass mode. Issuing the same command again turns it back on.
Labels:
debug,
potential bugs,
troubleshooting
Friday, June 6, 2008
Software Updates
FortiManager 3.0 MR6 Patch 3 and FortiOS 3.0 MR6 Patch 2 are now available on the Fortinet Support Website.
Labels:
software
Tuesday, April 29, 2008
Web URL Filtering does not block Websites
If you have defined a Web URL filter for blocking certain web sites but simply can't seem to get it to work (i.e. you can still access the websites you want to block) try restarting the HTTP proxy. On the CLI enter the following command:
diag test application http 99
diag test application http 99
Labels:
CLI,
fortigate,
troubleshooting
Friday, April 25, 2008
Web URL Filtering breaks SSL communication
If you have run into problems with devices exchanging configuration updates over SSL on port 443 and you are using Web URL Filtering try disabling the filtering for HTTPS. Fortinet TAC is currently investigating this issue.


Labels:
fortigate,
potential bugs
Wednesday, April 23, 2008
Fortimanager Device Synchronization
In the latest releases of Fortimanager there is no longer a "Synchronize all Devices" button in the GUI. If you have made changes to your firewalls through their individual Web interfaces you can bring all your configurations up to date in your Fortimanager using the following CLI command:
execute fmpolicy reload group "groupname" (hit ? for a list of groups)
execute fmpolicy reload group "groupname" (hit ? for a list of groups)
Labels:
CLI,
fortimanager
Thursday, April 17, 2008
Software Updates
FortiManager 3.0 MR6 Patch 2 and FortiAnalyzer 3.0 MR6 Patch 1 are now available on the Fortinet Support Website.
Labels:
fortianalyzer,
fortimanager,
software
Friday, April 11, 2008
Packet capture - SYN packets only
To capture only SYN packets (i.e. packets trying to initiate a session) you can use the following CLI command.
diag sniffer packet internal 'tcp[13] == 2'
This can be useful when you are trying to investigate suspicious activity on the network.
diag sniffer packet internal 'tcp[13] == 2'
This can be useful when you are trying to investigate suspicious activity on the network.
Thursday, April 10, 2008
IPSEC VPNs - Advanced NAT
Here are some pointers for when you are trying to build an IPSEC VPN to a remote organization and they NAT the remote host due to address overlap.
For example:
Remote Host: 172.16.1.2
Translated Public IP: 2.2.2.2
Remote Firewall: 2.2.2.1 (Cisco 3000 Series VPN Concentrator/PIX/ASA)
Local Firewall: 3.3.3.1 (Fortigate)
Local Network: 172.16.1.0/255.255.255.0 (NAT traffic to external firewall interface)
Begin by reading this previous post: Advanced IPSEC with Phase 2 Quick Mode Selectors
The one change to note is that you need to configure this scenario in policy mode. There is either a bug or a "feature" which prevents the NAT from working correctly in interface mode. I am currently investigating.
The challenge for the above scenario is typically to select the correct phase 2 source and destination addresses to match the remote access lists. In the above example your local configuration should look similar to the following:
config firewall address
edit "net-172.16.1.0/24"
set subnet 172.16.1.0 255.255.255.0
next
edit "host -2.2.2.2"
set subnet 2.2.2.2 255.255.255.255
next
edit "host-3.3.3.1"
set subnet 3.3.3.1 255.255.255.255
next
end
config firewall addrgrp
edit "encdom-local-remote"
set member "net-172.16.1.0/24" "host-3.3.3.1"
next
end
config vpn ipsec phase1
edit "Remote_Firewall"
set interface "external"
set dpd disable
set nattraversal enable
set dhgrp 2
set proposal 3des-md5
set keylife 86400
set remote-gw 2.2.2.1
next
end
config vpn ipsec phase2
edit "Remote_Tunnel"
set phase1name "Remote_Firewall"
set proposal 3des-md5
set src-addr-type name
set src-name "encdom-local-remote"
set dst-addr-type name
set dst-name "host-2.2.2.2"
set keylifeseconds 28800
next
end
config firewall policy
edit 1
set srcintf "internal"
set dstintf "external"
set srcaddr "n-172.16.1.0/24"
set dstaddr "h-2.2.2.2"
set action ipsec
set schedule "always"
set service "ANY"
set profile-status enable
set logtraffic enable
set profile "scan"
set outbound enable
set natoutbound enable # Hide traffic behind firewall's external interface
set vpntunnel "Remote_Firewall"
next
end
Here is what you are telling the firewall: Take my traffic from 172.16.1.0/24 and send it through the VPN tunnel to the remote firewall. NAT the traffic so it appears to be coming from my firewall's external interface 3.3.3.1.
Notice that in the phase 2 quick mode selectors you specify both 3.3.3.1 as well as your local network 172.16.1.0/24. Otherwise the phase 2 parameters sent to the peer do not match.
Monday, April 7, 2008
Recommended Reading
Migrating to IPv6 - A practical guide to implementing IPv6 in mobile and fixed networks
Author: Marc Blanchet
ISBN: 0-471-49892-0
A must read if you are even thinking about implementing IPv6 in your network.
Author: Marc Blanchet
ISBN: 0-471-49892-0
A must read if you are even thinking about implementing IPv6 in your network.
Sunday, April 6, 2008
Fortinet Maximum Values by Platform
Ever wondered about the maximum number of interfaces, Vlans, VPN tunnels or static routes that you can define for your Fortigate platform? Here is a very helpful list of all features and their maximum values broken down by platform.
Fortinet Maximum Values Matrix
Fortinet Maximum Values Matrix
Tuesday, April 1, 2008
Pedal to the metal with FortiAnalyzer
Beginning in 3.0 MR3 FortiAnalyzer supports the ext3 file system in addition to the Reiser file system used in previous versions. The ext3 file system provides much better stability and it is the recommended filesystem to use on all FortiAnalyzer units. To convert to the ext3 filesystem upgrade your FortiAnalyzer to 3.0 MR3 or above and reformat your log disks or change RAID levels which will cause all information to be erased.
Beginning in MR4 you can also speed-up the FortiAnalyzer by indexing the ext3 file system. Execute the following command on the CLI: "diagnose sys file-system fsfix". This command will check and index the filesystem. It will take some time and reboot the FortiAnalyzer, however the perfomance increase is tremendous so this is highly recommended.
Also, Fortinet recommends that you run this command periodically if you receive a lot of log traffic.
Labels:
CLI,
fortianalyzer,
performance
Tuesday, March 25, 2008
Software Updates
FortiOS 3.0 MR6 Patch 1 is available for all Fortigate platforms and the Fortimanager appliance. Also FortiOS 3.0 MR5 Patch 5 is available for the Fortigate platform which includes some minor bug fixes over MR5 Patch 4..
Session Timeouts
The Fortinet platform like most other stateful firewalls keeps track of open TCP connections. Each established session is assigned a timer which gets reset every time there is activity. If the timer expires due to inactivity the session is removed from the firewall tables and you will have to re-establish the connection. The session can also be cleared without waiting for the timer to expire if the firewall sees a FIN or RST packet for a given session.
Imagine you have a telnet connection on port 23 to a server in your DMZ. There is a script which executes periodically to poll some data using the telnet session. You notice that when the script hasn't executed in 60 minutes the telnet session is lost and you have to re-establish the session.
The easy answer is to increase the session ttl (time-to-live or timeout). This can be done on the CLI on a global basis for all ports or only for specific ports. Keep in mind that raising the timeout values for all ports can significantly increase the amount of system resources (especially RAM) consumed. This is due to the fact that the firewall now has to potentially keep track of the same number of sessions for a longer period of time. The default value of 60 minutes/3600 seconds should be ok for most applications.
The following example sets the timeout value for all TCP services to 3000 seconds but increases the timeout for telnet (port 23) to 7200 seconds.
config system session-ttl
set default 3000
config port
edit 23
set timeout 7200
next
end
end
DHCP Address Reservations
If you use the DHCP server on the Fortigate you can configure DHCP address reservations to always assign specific IP addresses to a computer, based on its MAC address.
Use the CLI command config system dhcp reserved-address to reserve an IP address for a particular client identified by its device MAC address and type of connection. The DHCP server then always assigns the reserved IP address to the client. The number of reserved addresses that you can define ranges from 10 to 200 depending on the FortiGate model.
Use the CLI command config system dhcp reserved-address to reserve an IP address for a particular client identified by its device MAC address and type of connection. The DHCP server then always assigns the reserved IP address to the client. The number of reserved addresses that you can define ranges from 10 to 200 depending on the FortiGate model.
Use the following syntax to always assign 192.168.1.1 to the device with MAC address 00:04:f1:11:11:11.
config system dhcp reserved-address
edit "ip_phone"
set ip 192.168.1.1
set mac 00:04:f1:11:11:11
next
end
edit "ip_phone"
set ip 192.168.1.1
set mac 00:04:f1:11:11:11
next
end
In FortiOS 5.x use the following syntax
config system dhcp server
edit 1 (or other number as appropriate)
config reserved-address
edit 1
set ip 192.168.1.1
set mac 00:11:22:33:44:55
next
next
next
edit 1 (or other number as appropriate)
config reserved-address
edit 1
set ip 192.168.1.1
set mac 00:11:22:33:44:55
next
next
next
end
SIP and H.323
If you run into problems with SIP and H.323 traversing your Fortigate firewalls this may be related to the SIP and H.323 session helpers (i.e. proxies). You can tweak them on the command line only. Here is what a typical configuration looks like:
config system session-helper
edit 1
set name pptp
set port 1723
set protocol 6
next
edit 2
set name h323
set port 1720
set protocol 6
next
edit 3
set name ras
set port 1719
set protocol 17
next
*** snip ***
edit 12
set name sip
set port 5060
set protocol 17
next
edit 13
set name dns-udp
set port 53
set protocol 17
next
end
To disable the SIP and H.323 session helpers use the following syntax:
config system session-helper
delete 12
delete 3
delete 2
end
Keep in mind to delete session helpers starting at the highest numbered one. Otherwise you may inadvertently delete the wrong session helpers if you are not careful.
*****
Update: In FortiOS 3.0 MR6 and above you should also try the following commands:
config system settings
set sip-helper disable
end
and
config system settings
set sip-nat-trace disable
end
config system session-helper
edit 1
set name pptp
set port 1723
set protocol 6
next
edit 2
set name h323
set port 1720
set protocol 6
next
edit 3
set name ras
set port 1719
set protocol 17
next
*** snip ***
edit 12
set name sip
set port 5060
set protocol 17
next
edit 13
set name dns-udp
set port 53
set protocol 17
next
end
To disable the SIP and H.323 session helpers use the following syntax:
config system session-helper
delete 12
delete 3
delete 2
end
Keep in mind to delete session helpers starting at the highest numbered one. Otherwise you may inadvertently delete the wrong session helpers if you are not careful.
*****
Update: In FortiOS 3.0 MR6 and above you should also try the following commands:
config system settings
set sip-helper disable
end
and
config system settings
set sip-nat-trace disable
end
Labels:
CLI,
fortigate,
troubleshooting
IPv6 Support in FortiOS 3.0 MR6
One of the most significant features that made it into the GUI in FortiOS 3.0 MR6 is support for IPv6. It is not immediately obvious however since you have to enable it under System -> Admin -> Settings.

Once enabled you can define IPv6 addresses, policies, IPv6 VPNs and monitor the IPv6 routing table.

Fortigate Debug Commands
Here is a very good explanation of Fortigate CLI debug commands that we find it difficult to live without :) Fortinet Debug Commands
Labels:
CLI,
debug,
troubleshooting
Fortinet to non-Fortinet site-to-site VPNs
When configuring site-to-site VPNs between a FortiGate unit and another vendor's VPN gateway, you should only configure one non-contiguous subnet per Phase 2 tunnel. Although the FortiGate can associate multiple subnets (aka "proxy IDs") with a single phase 2 SA, most other vendors do not support this. Also, some vendors will not support an IP range as a selector/proxyID. Be sure to define your firewall address as a subnet not a range.
Example: IPsec VPN between Fortigate and Cisco PIX
Example: IPsec VPN between Fortigate and Cisco PIX
- Several subnets are hosted behind the PIX and the FortiGate (eg. 10.1.1.0/24 and 10.1.2.0/24 behind the FortiGate, and 192.168.1.0/24 and 192.168.2.0/24 behind the PIX).
- Remote subnets (or hosts) are defined in the Fortigate as an Address Group (192.168.1.0/24 and 192.168.2.0/24).
access-list ipsec_vpn permit ip 192.168.1.0 255.255.255.0 10.1.1.0 255.255.255.0
access-list ipsec_vpn permit ip 192.168.2.0 255.255.255.0 10.1.2.0 255.255.255.0
Using VPN in policy mode on the Fortinet:
- Create two address groups, one containing your local networks and one containing the remote networks.
- Add a policy with your local group as the source, the remote network group as the destination and the action set to IPSEC. Select the corresponding remote firewall from the drop down list.
- In FortiOS 3.0 you point the firewall policies to a specific firewall rather than towards a phase 2 SA. This allows you to define a single policy and the firewall will automatically determine the appropriate SA to use.


Monday, March 24, 2008
Filtering Dynamic Routes
Sometimes it is necessary to filter dynamically learned routes from being advertised to your network. To do this on the Fortigate platform you can utilize router access lists and router prefix lists. Router access lists are used for filtering OSPF routes, router prefix lists are used for filtering BGP routes. Below are examples for each type of access list. Configuring access lists is currently command line only. FortiManager 3.0 MR6 has the ability to define access and prefix lists using the GUI but you still have to utilize the CLI to apply them.
Common setup:
-Your firewall is connected to 2 private networks, 10.1.1.0/24, 192.168.1.0/24
-Your firewall is connected to the Internet, using 1.1.1.0/24
-You do not want 1.1.1.0/24 to be advertised into your network
Router Access Lists:
config router access-list
edit "filter-internet-network"
config rule
edit 1
set action deny # Prevens routes from being advertised
set prefix 1.1.1.0 255.255.255.0 # The route you want to filter
set exact-match enable
next
edit 2
set exact-match disable # Permit all other routes to be advertised
next # since the default action is permit
end
Apply the access list in your OSPF configuration:
config router ospf
set abr-type cisco
config area
edit 0.0.0.0
next
endconfig distribute-list
edit 1
set access-list "filter-internet-network"
next
endRouter Prefix Lists:
config router prefix-list
edit "filter_internet_network"
config rule
edit 1
set action deny
set prefix 1.1.1.0 255.255.255.0
unset ge # Unsetting ge and le has the same effect as
unset le # "exact-match disable" in OSPF
next
edit 2
set prefix any
unset ge
unset le
next
end
Apply the prefix list in your BGP configuration:
config router bgp
set as 65000
config neighbor
edit 192.168.1.1
set next-hop-self enable
set prefix-list-out "filter_internet_network"
set remote-as 65000
next
end
Note that since you define neighbors statically in BGP the prefix lists in BGP are also applied on a per-neighbor basis. In OSPF the access lists apply to the entire area.
Labels:
access lists,
CLI,
dynamic routing,
fortigate
Dynamic Routing Protocols over IPSEC VPNs
This article describes how to configure dynamic routing protocols such as OSPF or BGP when using IPSEC VPNs. BGP is fairly easy since you define static neighbors. It does get a little more tricky when using multicast-based protocols such as OSPF. But despair not for help is nigh ;)
Start by building your site-to-site VPN tunnels in interface mode (see here for more info on interface mode). Important Note: Make sure your Phase 2 quick mode selectors are set to 0.0.0.0/0.
Once you have your tunnels configured go to Network -> Interface and expand the blue triangle next to the interface to which you have the tunnel attached:
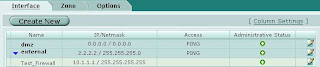
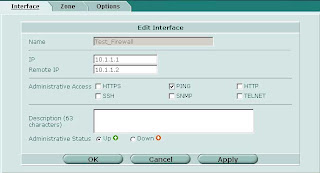
Something which is not immediately obvious is that you can define an IP address on the tunnel interface. Edit the tunnel interface and assign unique IP addresses (i.e. something that is not in use on your network, typically a private IP) for the local and remote IP:
On the other side of the tunnel perform the same operation, reversing the settings for local and remote IP.
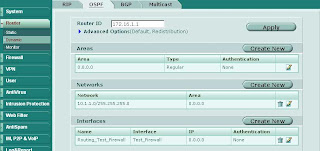
Now on to the OSPF side of things. Under Router -> Dynamic -> OSPF define Area 0.0.0.0 (the backbone). Then configure a Network which includes the network of the tunnel interface and place it in area 0.0.0.0. Under Interfaces create an interface tied to the tunnel interface. You can leave the IP as 0.0.0.0.
Repeat the same on the other end and you should see your routes starting to come in as OSPF dynamic routes. To control which routes are advertised you can redistribute networks under the Advanced Options in OSPF. You can also apply router access lists to filter networks from being advertised. More on router access lists (used for OSPF) and router prefix lists (used for BGP) in another post.
Start by building your site-to-site VPN tunnels in interface mode (see here for more info on interface mode). Important Note: Make sure your Phase 2 quick mode selectors are set to 0.0.0.0/0.

Once you have your tunnels configured go to Network -> Interface and expand the blue triangle next to the interface to which you have the tunnel attached:

Something which is not immediately obvious is that you can define an IP address on the tunnel interface. Edit the tunnel interface and assign unique IP addresses (i.e. something that is not in use on your network, typically a private IP) for the local and remote IP:

On the other side of the tunnel perform the same operation, reversing the settings for local and remote IP.
Now on to the OSPF side of things. Under Router -> Dynamic -> OSPF define Area 0.0.0.0 (the backbone). Then configure a Network which includes the network of the tunnel interface and place it in area 0.0.0.0. Under Interfaces create an interface tied to the tunnel interface. You can leave the IP as 0.0.0.0.

Repeat the same on the other end and you should see your routes starting to come in as OSPF dynamic routes. To control which routes are advertised you can redistribute networks under the Advanced Options in OSPF. You can also apply router access lists to filter networks from being advertised. More on router access lists (used for OSPF) and router prefix lists (used for BGP) in another post.
Labels:
dynamic routing,
fortigate,
ipsec,
ospf,
VPN
Saturday, March 22, 2008
Advanced IPSEC VPNs - Phase 2 Quick Mode Selectors
Most of the time when you create site-to-site VPN tunnels the Phase 2 Quick Mode Selector just doesn't cut it. In FortiOS 2.8 you were able to choose between manually entering source and destination addresses or selecting objects from a drop-down list. This feature is absolutely essential when creating VPNs that contain discontiguous subnets. A good example:
Source subnets: 172.16.1.0/24 and 192.168.1.0/24, destination subnets: 172.16.99.0/24 and 10.1.1.0/24.
In FortiOS 3.0 up to MR6 the drop-down option no longer exists in the GUI. However you can still pop the hood and get at the internals using the CLI. Here's how:

Source subnets: 172.16.1.0/24 and 192.168.1.0/24, destination subnets: 172.16.99.0/24 and 10.1.1.0/24.
In FortiOS 3.0 up to MR6 the drop-down option no longer exists in the GUI. However you can still pop the hood and get at the internals using the CLI. Here's how:
- In the GUI define the local and remote subnets for the VPN
- Group local and remote subnets into separate address groups (e.g. "encdom-local-remote" and "encdom-remote-local")
- On the CLI
- # config vpn ipsec phase2 (or #config vpn ipsec phase2-interface if you are using interface mode)
- # set src-addr-type name
- # set src-name encdom-local-remote (the address group containing your local subnets)
- # set dst-addr-type name
- # set dst-name encdom-remote-local (the address group containing the remote subnets)
- # end

Labels:
CLI,
interface mode,
ipsec,
VPN
Subscribe to:
Posts (Atom)