In the Fortigate GUI:
-Go to Log&Report -> Log Config
-Enable the Syslog check box and and enter the name or IP address of your Cisco MARS collector
-Set Port to 514
-Set Minimum Log Level to Information and the Facility to Alert
That's it on the firewall side. Now any active firewall rule configured to log traffic will send syslog information to MARS.
In the Cisco MARS GUI:
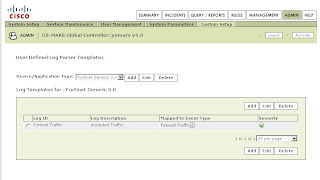
-Go to Admin -> Custom Setup -> User Defined Log Parser Templates
-At the Device/Application type click Add and enter the following values:
-Type: Appliance
-Vendor: Fortinet
-Model: Generic
-Version: 3.0
-Click Submit

-Under Log Templates for Fortinet Generic 3.0 click Add and enter the following values:
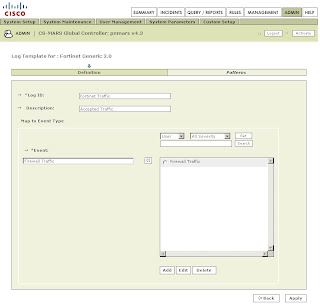
-Log ID: Fortinet Traffic
-Description: Accepted Traffic
-Under the Map to Event Type click Add and enter the following values:
-Event ID: Firewall Traffic
-Description: Firewall Traffic
-Severity: Green
-Click Submit

Back on the Log Template Page select the newly created Firewall Traffic Event Type and click on the left double arrow to move it into the Event box. Then click Apply.
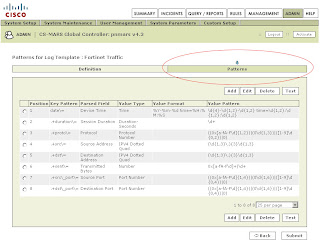
Once this has been applied click on Patterns which has become an active link.
Add the following patterns in order. Leave all Value Format fields blank except for the one in position 1:

Position: 1
Key Pattern: date\=
Parsed Field: Device Time
Value Type: Time
Value Format: %Y-%m-%d time=%H:%M:%S
Value Pattern: \d{4}-\d{1,2}-\d{1,2} time=\d{1,2}:\d{1,2}:\d{1,2}
Position: 2
Key Pattern: .+duration\=
Parsed Field: Session Duration
Value Type: Duration-Seconds
Value Pattern: \d+
Position: 3
Key Pattern: .+proto\=
Parsed Field: Protocol
Value Type: Protocol Number
Value Pattern: ((0x[a-fA-F\d]{1,2})|(0\d{1,3})|([1-9]\d{0,2})|0)
Position: 4
Key Pattern: .+src\=
Parsed Field: Source Address
Value Type: IPV4 Dotted Quad
Value Pattern: (\d{1,3}\.){3}\d{1,3}
Position: 5
Key Pattern: +.dst\=
Parsed Field: Destination Address
Value Type: IPV4 Dotted Quad
Value Pattern: (\d{1,3}\.){3}\d{1,3}
Position: 6
Key Pattern: .+sent\=
Parsed Field: Transmitted Bytes
Value Type: Number
Value Pattern: 0x[a-fA-F\d]+|\d+
Position: 7
Key Pattern: .+src\_port\=
Parsed Field: Source Port
Value Type: Port Number
Value Pattern: ((0x[a-fA-F\d]{1,4})|(0\d{1,6})|([1-9]\d{0,4})|0)
Position: 8
Key Pattern: .+dst\_port\=
Parsed Field: Destination Port
Value Type: Port Number
Value Pattern: ((0x[a-fA-F\d]{1,4})|(0\d{1,6})|([1-9]\d{0,4})|0)
Click Submit.
Under System Setup -> Device Configuration and Discovery Information -> Security and Monitor Devices you can now configure devices of type Fortinet Generic 3.0
(Thanks to Pandriya for spotting a typo in this post)
7 comments:
Hi,
I've completed the steps - they are a little vague in terms of when you create each FortiNet "position" it asks for a new name for each "value name" I think or something. I cannot remember now.
However I do not seem to be getting anything from my FortiNet :(
Thanks for the guide though man - awesome work.
I will post some screenshots later to try and make it more intuitive :)
With this blog we get more information on fortinet firewall. Our ecommerce platform Sancuro Helps businesses to purchase actual Remote Configuration Services for Fortinet firewall. Visit https://www.sancuro.com/services/fortinet-firewall for more details.
asdaadasfasdasdasf
FG-200F
sasdafadsa asf afas das das as fa fsa f
FG-200F-BDL-950-12
GOOD STUFF
FG-40F
AMAZING WORK
FG-40F-BDL-950-12
Post a Comment